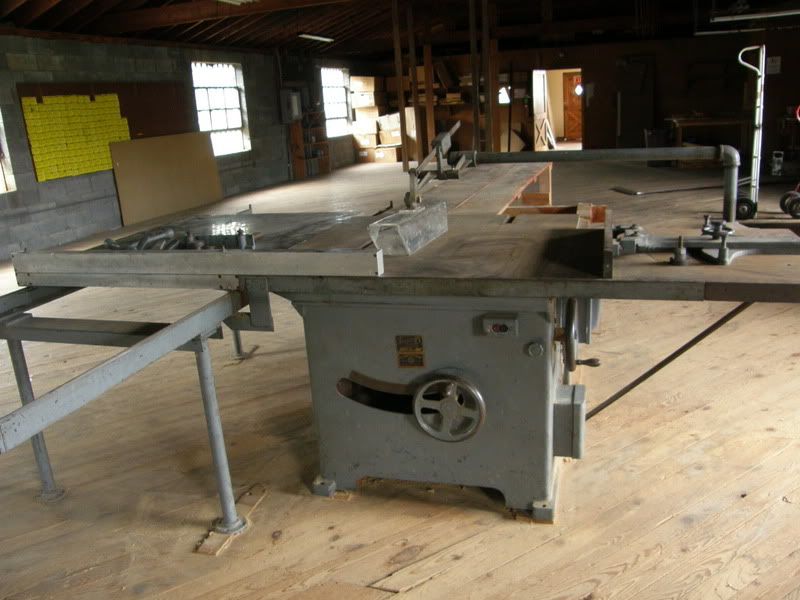
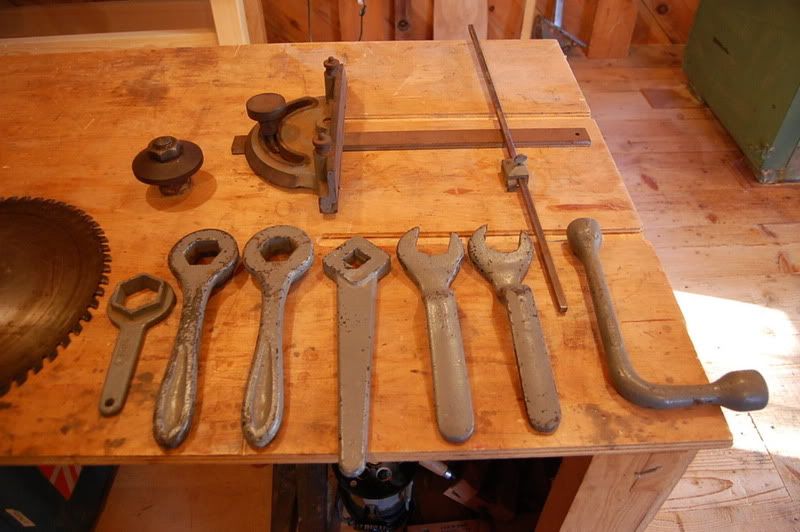
Hi, I am new to this site - I just picked up a 1951 xj table saw with 5 hp woods motor. I would like to restore this saw but I have never done a restoration. Attached are pics of saw before I moved it. It came with a J-420 rolling table, 7 wrenches, miter guage and two table extensions (one steel, one cast iron). Previous owner tells me it was running last fall when he disconnected the 3 phase in building. The table top needs to be cleaned and I would like to replace the bearings and clean the motor. Blade tilt works easily but raising is difficult, I'm assuming because the ways are gummed up. I now have the top off and I am wondering if I should remove the motor and yoke assembly completely like Pete did on his saw. This would make it easier to clean the raising assembly I think. Any suggestions anyone has would be appreciated. I will include more photos of the saw with top off next time. Thank you -Jim.
http://i1191.photobucket.com/albums/z47 ... 100005.jpg
http://i1191.photobucket.com/albums/z47 ... C_0008.jpg
http://i1191.photobucket.com/albums/z47 ... C_0001.jpg
[/img]
tannewitz xj project
Moderator: crzypete
-
mr douglas t
- Posts: 269
- Joined: Fri Dec 17, 2004 9:58 pm
- Location: Westhampton, MA
- Contact:
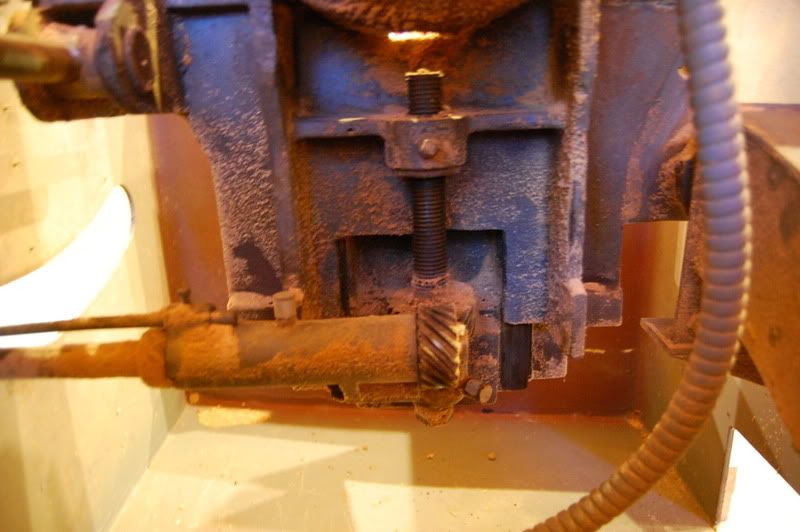
thanks Mr douglas t, I added some more photos of the motor and raising assembly with table off. I tried to get a close up of what I think are oil cups on the raising and tilting shafts but when I unscrewed the caps they were filled with black grease. Not sure if after cleaning I should pack grease back in them or use oil.
http://i1191.photobucket.com/albums/z47 ... SC0006.jpg
http://i1191.photobucket.com/albums/z47 ... C_0010.jpg
http://i1191.photobucket.com/albums/z47 ... 0008-1.jpg
http://i1191.photobucket.com/albums/z47 ... C_0009.jpg
http://i1191.photobucket.com/albums/z47 ... SC0006.jpg
http://i1191.photobucket.com/albums/z47 ... C_0010.jpg
http://i1191.photobucket.com/albums/z47 ... 0008-1.jpg
http://i1191.photobucket.com/albums/z47 ... C_0009.jpg
Hey Jim, Nice buy and welcome to the forum. I am a chronic taker aparter. I would be thinking about those bearings while you have the top off. Replacing the bearings on my saw definitely helped with the run out on the arbor.
I would also be tempted to pull the trunnion apart to clean it, but I am an over-doer, so if it is running alright, you may want to ignore me and leave it alone.
Those cups were meant to be filled with grease. Oil is too light for that application and will just run out. The concept of the cup is that you pack them full of grease and tighten them just until a little grease comes out, then in the future, whenever you wish to apply grease, you give them a slight turn forcing new grease into the saw.
It is nice that it cam with all of those wrenches. It looks like you may have even more than a full set.
Glad you snagged it off of craigslist, my trigger finger was itchy even though I have absolutely no space or need for it.
Pete
Pete - I think I am going to lift the motor out with a chain fall. It looks like I can remove a stop block and continue to raise the motor with the raising screw until it comes off the ways. Not sure if I should do that or lift the entire yolk out first like you did and then take it apart. Since you cleared up the grease cup question I realized I have the same type of cup on my timber frame chain mortiser - its used to grease the tip of the bar.
Since I have never messed with an electric motor I am tempted to take it to one of the reputable companies in the area and have them clean it, replace the bearings, test it and check the run out. It sounds like it will be about $200 if they don't have to rewind it.
Since I have never messed with an electric motor I am tempted to take it to one of the reputable companies in the area and have them clean it, replace the bearings, test it and check the run out. It sounds like it will be about $200 if they don't have to rewind it.
fair enough to use the motor shop, especially if you do not have the proper pullers to take it apart safely. If you do want to attempt it, it is certainly not the hardest thing. 3Ø motors are actually easier to take apart than 1Ø ones- less internal workings.
I believe the motor should just lift out, but I forget if there was something other than removing the stop. I would loosen the gibs to make it easier.
Pete
I believe the motor should just lift out, but I forget if there was something other than removing the stop. I would loosen the gibs to make it easier.
Pete
I may try the motor myself. The stub arbor came off fairly easily, helped by the wrenches that came with the saw. The 3 hex screws that hold on the bearing cap do not want to move though. I'll try some PB blaster and let them soak a little. Any suggestions? If I can't get them to budge I don't want to risk stripping or breaking them. I was going to try working on the table top tomorrow also. Maybe soak with WD40 and sand starting with 240 and end with 600 wet sand paper. The top has a dark patina and the famous grinding pattern cannot be seen at all. I'm open for suggestions from anyone on cleaning the top.
I find heat works wonders on stuck bolts and is definitely under-rated. ALternate heat and PB blaster. Also, any sort of impact wrench helps as well- the little bumps work wonders.
As to the top, I prefer to be way more aggressive, as in 120 or 150 grit to start. On metal, it is way less powerful than you may think. I use a random orbit sander and go for broke. I also never work up to 600 on a machine top. You'll quickly see what you like. lastly, I tend to work dry- I don;t like the mess that WD40 creates- I actually try to keep it out of my shop.
Pete
Nice purchase!
On every Tannewitz I've seen, the tables are hand scraped, not ground. If it has random rectangular markings, it's been scraped to a finish, not ground. Definitely not something you'll find on today's machines.
http://www.woods-metal-shaping.com/scraping/
On every Tannewitz I've seen, the tables are hand scraped, not ground. If it has random rectangular markings, it's been scraped to a finish, not ground. Definitely not something you'll find on today's machines.
http://www.woods-metal-shaping.com/scraping/
Hey Arnhead,
Scraping is a very cool process and one that we should get into more, but the tops of the tannewitz saws are not actually done using that process. I believe this is one of the common mis-conceptions about their saws.
I talked to the factory ten years ago about the process. They said it was a custom machine that was basically a surface grinder utilizing a wheel with a wobble. They said that they sold the machine years ago, so the new machines no longer have the distinct pattern.
In my own studying of the pattern on my two saws, I theorize that the tops were clamped 45º to the axis of travel. The marks line up the best when view that way and you can see how the scallop mark would be made as the high point of the wheel scooped out the v.
The look is quite cool- I'd equate it as being similar to the frosting pattern on a bridgeport, Frosting is a decorative pattern often applied over a scraped surface. Scraping is used for creating ultra high precision surfaces, definitely not something needed for a table saw top. The site you linked to has some nice examples.
I am not sure whether Tannewitz pitched this process as a way to decrease friction, or simply used it as a trademark look, but in either event, I sure like it!
Pete
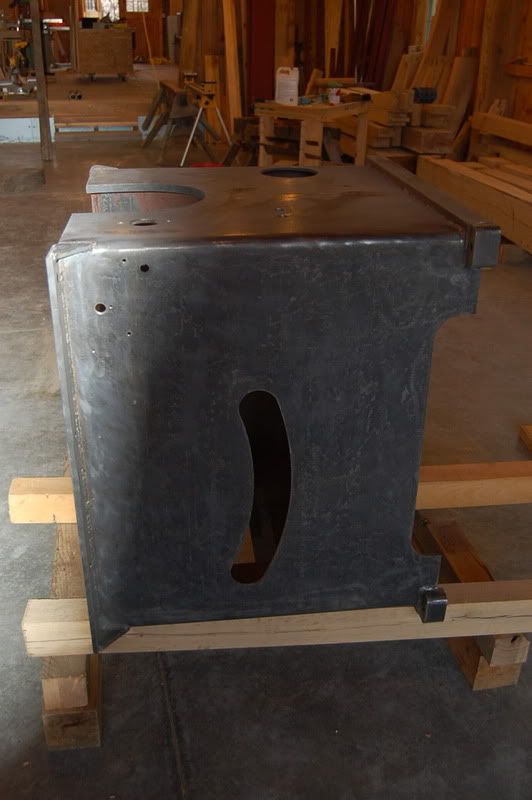
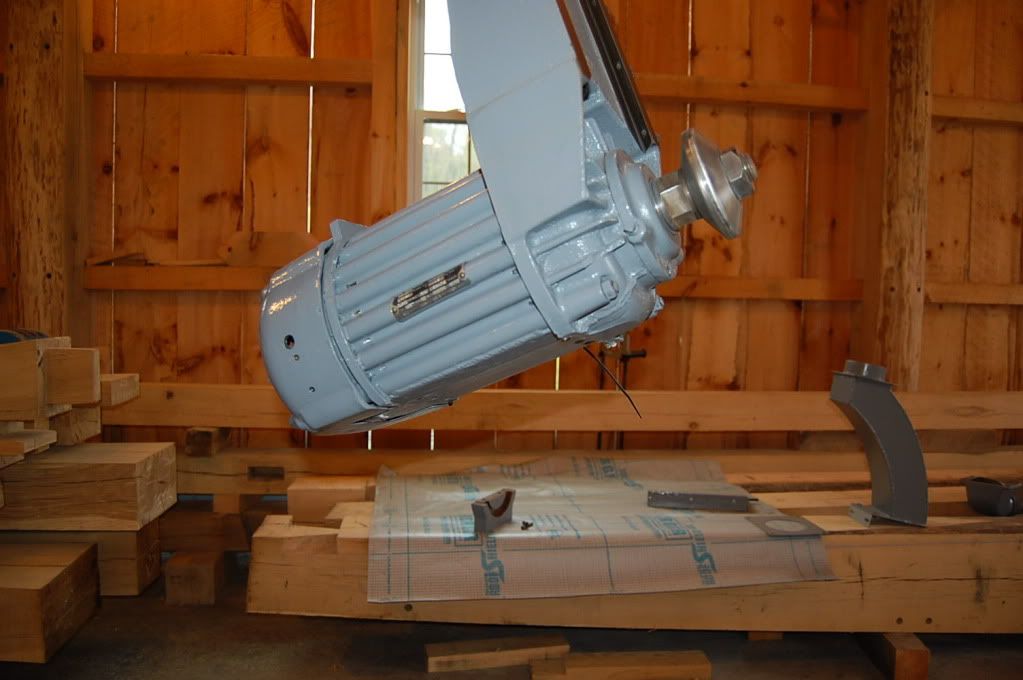
Pete, I managed to lift the motor out by removing the raising stop and cranking on the raising screw until it cleared the ways. I had it attached to a chain fall which made it easy. I decided to take it to Gray electric in Schenectady after I could not get the 1.75" bearing nut off the back of the motor. They charged me $350 . New sealed bearings, tested and painted (not the best paint job, I'll have to touch it up). They tested the run out at the shoulder and on the flange with the arbor attached (where you checked yours) . It was less than .0001 on the shoulder and just over .0002 on the saw flange. It turns much easier than it did before. They said the windings looked good. The color is a blue grey so I had NAPA match it and I started to paint the trunion and other small parts.
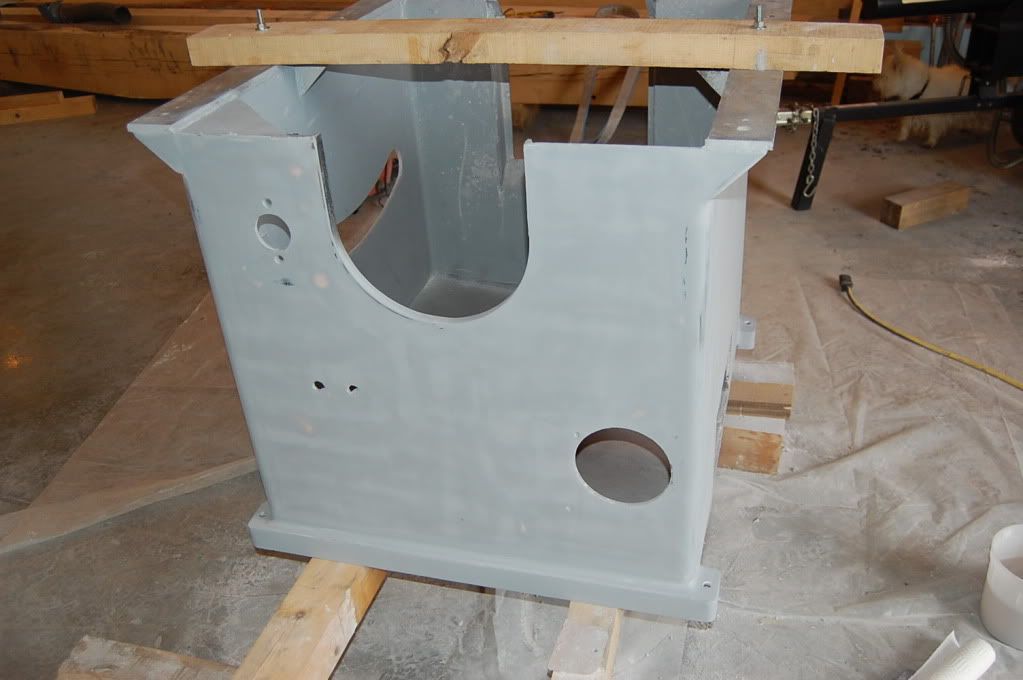
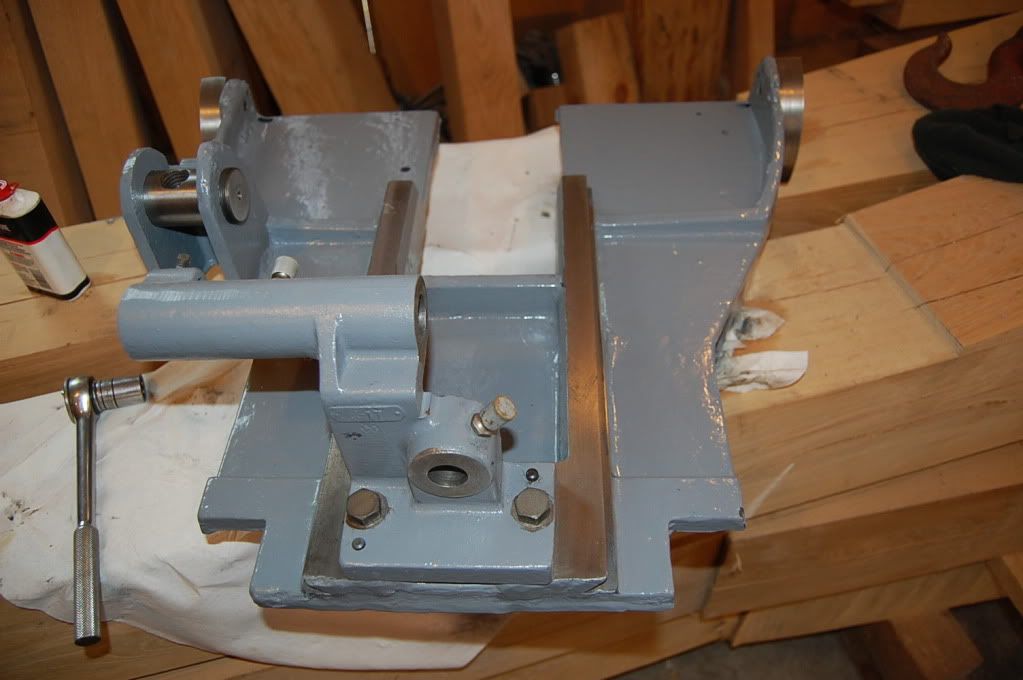
I disassembled the rest of the saw and started cleaning the paint off with a wire wheel. Attached are some photos of the trunion, motor, 90 degree stop support, and the saw base. When I get all the paint off the base I'll start with the body filler and sanding.
http://i1191.photobucket.com/albums/z47 ... C_0041.jpg
http://i1191.photobucket.com/albums/z47 ... C_0046.jpg
http://i1191.photobucket.com/albums/z47 ... C_0040.jpg
-
DenaliPilot
- Posts: 63
- Joined: Thu May 17, 2007 8:22 am
- Location: Denali, Alaska


The tanny is looking good. I am glad the motor is all trued up. It should be easy sailing from here on in. The Bondo is a bit of a pain, but to me the results are definitely worth it, Don't be afraid to get out an angle grinder or file it there are any rough or high spots of metal as well.
As to timberframing, you should post some pictures of your new shop!
Pete
As to timberframing, you should post some pictures of your new shop!
Pete
DP - thank you for fixing the photos. Not sure how you did that but it makes it a lot easier to view the posts.
Pete, I noticed around the feet of the saw some welds that I can make a little better with some grinding. They are similar to what you encountered on your saw.
I'll post some shop photos in the near future. Still deciding what to use to heat the radiant floor. A business near my house just went with coal and orders it in bags by the tractor trailer load so It looks like I will be able to buy it from them if I decide to go that way.
My concern with coal and radiant heat would be the high amount of interaction required. It would be hard to go away for a few days. But, I have no experience with coal, just going on my instinct. Would it be burned in one of those outdoor furnaces? How many days can you get out of a loading? Cost compared to other fuels? I have no idea how you even measure these things!
Radiant is really slow to make temperature changes- on the order of 12 hours to raise the temp 8 -10º. It is a great heat to work with in a building you use everyday, and I do not change my thermostat unless I go away for a week or more- just not worth messing with it.
With my building which is 1800 square foot footprint I burn just about 400 gallons of propane a season.
Pete
-
DenaliPilot
- Posts: 63
- Joined: Thu May 17, 2007 8:22 am
- Location: Denali, Alaska
Easiest method for me is to open your source image in it's own window. (Control+click on a mac, or right click (I think) on a pc, gets you to that option) Then just copy the url and paste it here between the [IMG] thingies.DP - thank you for fixing the photos. Not sure how you did that but it makes it a lot easier to view the posts.
I'm sure there's more elegant methods, but that's how I did yours.
Cheers. -DP
I decided to change the color to a light gray before I went any further. My first choice just appeared too dark. Anyway, I have the base primed and ready for paint. I spent a lot of time applying body filler and sanding. I hope to spray this weekend. The motor, yolk and some small parts I painted with an artist's brush like Pete did and they came out pretty good I think. I used an acrylic enamal auto paint from NAPA. The gray is close to the original color of the saw. Attached are recent photos from photo bucket. DP - I still can't seem to get a handle on how to attach the photos like you did. I'll try again next time - Jim.
Hey Jim I fixed your pics- you had the "diable BBCode in this post" box checked which was not allowing the image tags to work. If you make sure that that box is unchecked in the future it should allow you to post imbedded pics easily.
Saw is looking good and kinda familiar! I am looking forward to seeing the body painted up.
Pete
Saw is looking good and kinda familiar! I am looking forward to seeing the body painted up.
Pete