Crzypete's new Studio

All strange discussion and debates

Moderator: crzypete

Post Reply
crzypete
Posts: 1691
Joined: Thu Dec 16, 2004 10:45 am
Location: New York State
Contact:

Post by crzypete »

No need for more pics, everything that is there is there. The only thing the junction box does is prevent all of those romex cable crimps from being seen down at the circuit box below- basically makes a tidier job.

The romex enters the box, then ten feet of it is stripped and it goes directly to the panel below- nothing more than that.

The metal plates are fine, construction wood isn't that straight anyway. i have used them in renovation situations.

No way this guy is getting a pie. :roll:

Pete
swparish
Posts: 35
Joined: Tue Sep 11, 2007 4:18 pm
Location: Ft. Worth TX

Post by swparish »

Now I get it. A little slow, but I got there. :oops:
Thanks for the patience.
Stephen
crzypete
Posts: 1691
Joined: Thu Dec 16, 2004 10:45 am
Location: New York State
Contact:

Post by crzypete »

I just returned from a couple weeks at the old studio building furniture and progress has been made. While I was away the insulator has been working away. The building is rapidly transforming. Unfortunately I do not yet have pictures, but that will be something to look forward to tomorrow night.

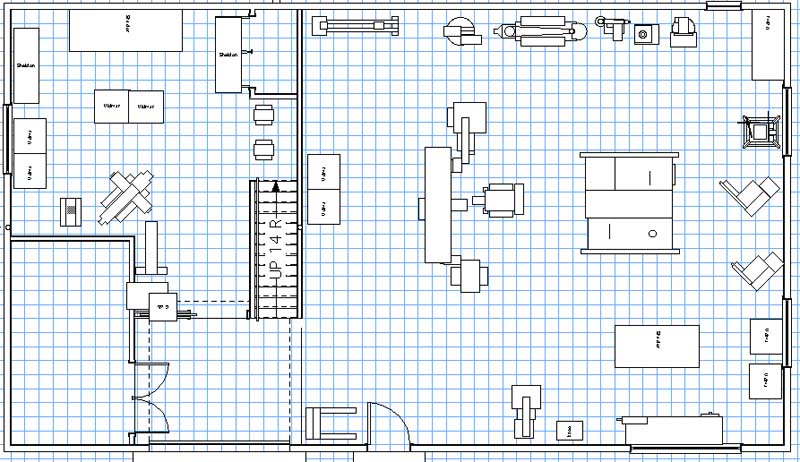
What I would like to share is a preliminary machine layout that I have been working on.
Image

The layout is over the original plans, so some changes have been made. The windows have been moved and the furnace room is accessed from the wood shop side. There is no longer a door in the doorway to the metal shop.

I realize I have not been posting interior shots of the building- I figured this out by trying to review pics while away and not finding any good interior shots in my library.

I will tune in a bit later and explain the drawing a bit better.

pete
nektai
Posts: 1019
Joined: Fri Dec 17, 2004 9:34 am
Location: Long Island, NY
Contact:

Post by nektai »

I am intrigued by the angled Hammonds. I am pleased to see that your Vector Works skills are improving.
crzypete
Posts: 1691
Joined: Thu Dec 16, 2004 10:45 am
Location: New York State
Contact:

Post by crzypete »

Nektai, the theory behind the angled hammonds is clearance for longer pieces- so they don't hit the other saw. Similar concepts are used in laying out machine shops- rows of angled lathes are quite efficient. I figure micro adjusting like this will take place once the machines are all in place.

here is a list of the major items, some are not drawn in, some may have to be sold for the sake of space:

Woodworking:
Oliver 166DD 20" jointer
Oliver 399 18" planer
Oliver 192 18" Bandsaw
Oliver 144 6" jointer
Oliver 25a 16x60 patternmakers lathe
Tannewitz 30" bandsaw
State 20" Disc
State 15" Disc
State Oscillating Spindle Sander
4 Hammond Glider Saws (2) G100, G44b, G3
Newton E30 edgesander
Porter Cable B10 10" vertical belt
3 Delta 17" Drillpresses
3 Headed Delta 17" Gangdrill
Delta Unisaw
Delta Shaper
Powermatic 66
AEM narrowbelt sander- 12"
JDS multi-router

Metalworking:
Cincinnati 15x30 traytop metal lathe
Bridgeport mill
Walker Turner 16" varispeed bandsaw
Johnson Model B horizontal bandsaw
Porter Cable G4 4" Vertical Belt
Mig welder
Tig Welder
4' Bantam press brake
3' Pexto slip roll

Support:
Crown lift
Vidmar cabinets

Pete
DenaliPilot
Posts: 63
Joined: Thu May 17, 2007 8:22 am
Location: Denali, Alaska

Post by DenaliPilot »

I just followed Nektai's tip-off and googled Vectorworks. Wow! Cool program! Almost as impressive as Pete's machine lineup. Is there an entry-level, freebie version of Vectorworks, like with Sketchup? Pete- if you can't make room for all your Hammonds in your floor plan... :wink:

DP
crzypete
Posts: 1691
Joined: Thu Dec 16, 2004 10:45 am
Location: New York State
Contact:

Post by crzypete »

Finally, Long awaited pictures. I am using a blown cellulose insulation. It is applied damp and it supposedly dries to a papermache consistency- this prevents settling. I am, fortunately, subcontracting this part out.

Here is the view of the wood section with insulation and plastic on the ceiling.
Image

The metalshop
Image

The loft
Image

The Insulators should be here tomorrow or friday to finish applying the cathedral ceiling, the furnace room, and a few other bits. The ceiling above the woodshop gets blown in after the sheetrock.
nektai
Posts: 1019
Joined: Fri Dec 17, 2004 9:34 am
Location: Long Island, NY
Contact:

Post by nektai »

Looks like they are doing a very nice job.

I had forgotten about all of the foam that you need to apply to the concrete. Will the subs be doing that for you or will you be covered in the ever clinging pink dust after ripping all that foam?
crzypete
Posts: 1691
Joined: Thu Dec 16, 2004 10:45 am
Location: New York State
Contact:

Post by crzypete »

Nektai, I am slated for another encounter with the pink demon. Hopefully it will go painlessly......

I am very happy with the job by the insulators, there are a lot of details and they are paying attention to them.

Pete
crzypete
Posts: 1691
Joined: Thu Dec 16, 2004 10:45 am
Location: New York State
Contact:

Post by crzypete »

The insulators were back today and they finished up applying all of the insulation except for the ceilings which get blown after the sheetrock.

here is there rig. One guy dumps bags into this hopper while the other guy directs the hose. The guy with the hose has a remote control pendant to turn the flow on or off.
Image

here is the cathedral ceiling after filling the slopes.
Image

after the insulators left I set to the task of applying the pink demon. Things went fairly quickly.
Image

Here is a view of the furnace room, which I had insulated for sound purposes. As well as the furnace, I envision keeping my air compressor and phase converter in there. The fan is circulating air, helping to dry out the wet applied cellulose.
Image

Pete
afuege
Posts: 47
Joined: Tue Sep 19, 2006 8:11 pm

Post by afuege »

Pete,
I used spray foam when I did my house and shop. This was a huge job at 85,000 BF. I put it out to bid with a few local contractors. The numbers I got back were staggering. I did a little research on the products and application. After I understood the process better, I bought a used proportioner and did the job myself. The proportioner, compressor, pumps, hoses, and all the tools cost $14,000. The material was another $8,500. The best price I got from the bids was $34,800. I started in the roof of the shop, after a little practice, I was able to move very quickly. I had both buildings insulated in a three day weekend. Because I was doing the job, I didn't spare any material. The wall and roof cavities are completely filled. The material I used was from a company called BioBased. It's a soy based product. There was no strong odor or fumes during or after the application. I would definitely recommend this to anyone considering insulation. The best part is the air stop. The insulation goes in as a liquid and then expands in a few seconds. It gets into every crack, space, crevice etc. This means no drafts around fixtures, light boxes, etc.

I have some video of me installing it in the house, I just need to find it.

Here's a picture of some work I did on an attic remodel of a friends house.
Image
AF
Somerset, New Jersey

http://www.owwm.net
DenaliPilot
Posts: 63
Joined: Thu May 17, 2007 8:22 am
Location: Denali, Alaska

Post by DenaliPilot »

I bet Arthur could resell that used proportioner and any other insul-specific eqiupment, and have an even more attractive job cost. Gotta admire that sort of DIY initiative.

Pete- your place is looking great. I thought the sound- insulated room under the stair was a prospective nursery- you know, planning ahead...

DP
crzypete
Posts: 1691
Joined: Thu Dec 16, 2004 10:45 am
Location: New York State
Contact:

Post by crzypete »

Arthur, cool info about the foam. I didn't realize a soy based product was available. Insane projects too.

Today was our first day of real hard frost. We had to stop the ongoing staining project that my brother has been working on in the barn and focus on the studio. After cleaning up this morning, we got back to working on the soffits. I am using a system for venting copying Nektai's studio.

The first step is spray painting the wood black so it won't show.
Image

Then 1/8" mesh is applied.
Image

Later in the day we ripped up 12 sheets of AC 1/2 plywood which will be the soffit material. It has yet to be stained.

While I was working on the soffit I took a moment to snap some pics of the work the insulators did.

Here is how they blocked out the trussed section to prevent insulation from overflowing into the soffit while allowing air to flow above.
Image

And here is the section by the cathedral ceiling. They use a foam vent piece to allow proper venting.
Image

The end of the day was spent playing with the front door which was delivered with the plywood. I had to modify the frame in order to fit my extra thick walls. Tomorrow I will have another trip to my local sawmill to replace the ugly "brickmold" trim that came on the door. The weather is supposed to get warmer which should help facilitate getting the soffit stained and in place. I am awaiting word from my drywaller.

Pete
crzypete
Posts: 1691
Joined: Thu Dec 16, 2004 10:45 am
Location: New York State
Contact:

Post by crzypete »

Another noteworthy step today, new front door.

Image

from the inside
Image

unfortunately the drywaller is a week and a half out. I have plenty to do in the meanwhile and he said he might be able to sneak in and rock the furnace room sooner- this would be great and having heat would help expedite the drywall process.

Pete
DenaliPilot
Posts: 63
Joined: Thu May 17, 2007 8:22 am
Location: Denali, Alaska

Post by DenaliPilot »

Makes it look real homey, hanging a door! You mentioned you have no roof penetrations. What's the plan for the furnace- out the wall?
crzypete
Posts: 1691
Joined: Thu Dec 16, 2004 10:45 am
Location: New York State
Contact:

Post by crzypete »

Yes, the furnace vents through the wall. It is propane powered and it is supposedly standard fair to vent it that way.

I forgot about the other downfall of the door- there is still a 10' square opening 5' from it, I have begun the procurement of materials to fix that problem as well- One of my stops this morning was back to Kilmer lumber for some more pine. Later I went to the real lumberyard and ordered some timberstrand 2x4's to make the doors.

Pete
crzypete
Posts: 1691
Joined: Thu Dec 16, 2004 10:45 am
Location: New York State
Contact:

Post by crzypete »

Things are inching along here. I always like pulling the transit out, it makes me feel like an old-timer in the era of laser levels. Unfortunately the task associated with the level was misery- excavating part of the driveway in preparation for a concrete pad in front of the entrance doors.
Image

Image

Later in the day, my prospects improved, I started the siding. At this pace I should have the building sided in 10 years or so.
Image

Pete
nektai
Posts: 1019
Joined: Fri Dec 17, 2004 9:34 am
Location: Long Island, NY
Contact:

Post by nektai »

When are you going to pour?

It may take you ten years but it is going to look VERY nice.
crzypete
Posts: 1691
Joined: Thu Dec 16, 2004 10:45 am
Location: New York State
Contact:

Post by crzypete »

Nektai, I am not sure when we are pouring, all of my delays have started moving forward so that is put off.

Today was spent siding. It makes a huge difference, and although it is slow it is very rewarding.

Here is the flashing for the windows. I took a trip to the lumber yard to buy drip edge for the top, but my rep talked me out of it. I am happy enough to have the cleaner look.
Image

I have been worried about Guzziguy laying in bed wondering if I am actually going to stain the ends of the boards. I took this pic to help him sleep easier.
Image

It was an odd day weather wise, cold and rainy this morning, but some great sun this afternoon.
Image

Here is the end of the days progress.
Image

The drywaller is on pace to start next wednesday. The soffit material is all stained and ready to be hung. The materials for the big "barn" doors are in at the lumberyard and will be delivered saturday. Everything is falling into place.

Pete
swparish
Posts: 35
Joined: Tue Sep 11, 2007 4:18 pm
Location: Ft. Worth TX

Post by swparish »

You know GG doesn't sleep. All his post are at 5:00 in the morning.
Post Reply